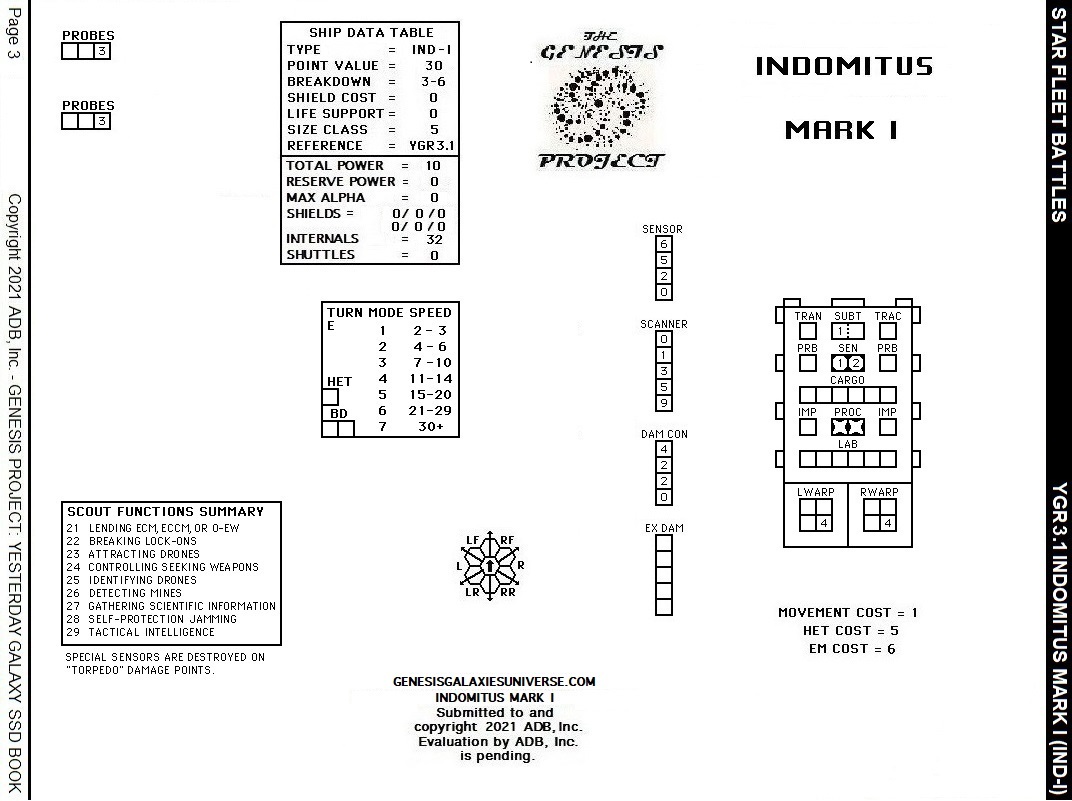
(PXSG1.0) SLEIPNIR’S SACRIFICE
by Ichaborn, Genesis Galaxies
PROJECT-X
The Battle of Saint Petrigio was a bloody conflict that nearly destroyed both sides. At its end, one badly damaged Republic ACA survived. Intent on destroying the Republic ACA was a relatively unscathed Regime FZ4, the only surviving member of its fleet.
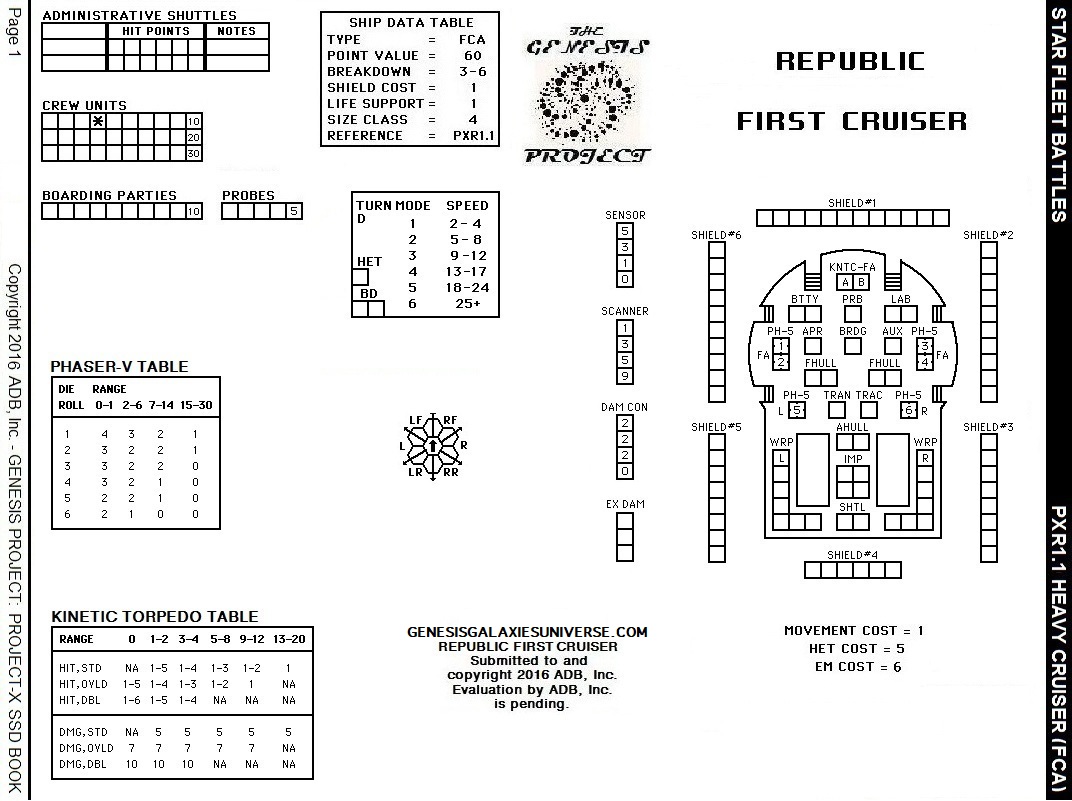
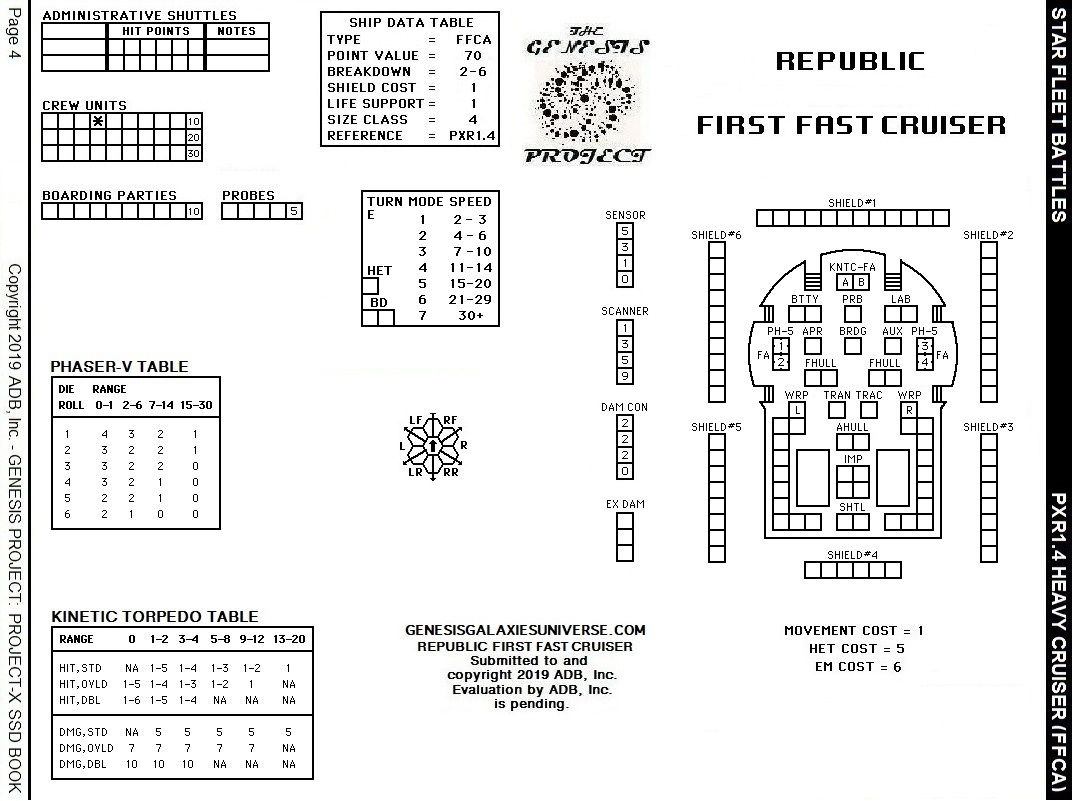
The Republic dispatched Sleipnir, a nearby Repubic FFCA, to save the Republic ACA from certain destruction.
(PXSG1.1) NUMBER OF PLAYERS: 2; the attacking player (Regime) and the defending player (Republic)
(PXSG1.2) INITIAL SET UP
DEFENDER: Repulic ACA in 1820, heading E, speed 2, WS-III.
Sleipnir Repubic FFCA in 0130, heading B, speed 18, WS-III.
ATTACKER: Regime FZ4 in 3712, heading E, speed 14, WS-III.
YEAR: Plaser should select a year before setting up the scenario. This will define the availability of ships, refits, fighters, missile speeds, and other items.
(PXSG1.3) LENGTH OF SCENARIO: The scenario continues until all forces belonging to one player have been destroyed, captured, or have disengaged.
(PXSG1.4) SPECIAL RULES
(PXSG1.41) MAP: Use a fixed map.
(PXSG1.42) SHUTTLES AND PFs:
(PXSG1.421) No ship in this scenario is qualified to carry an MRS shuttle
(PXSG1.422) There are no EW fighters in this scenario
(PXSG1.423) There are no PFs in this scenario
(PXSG1.43) COMMANDER’S OPTION ITEMS
(PXSG1.431) Each ship can have additional or special equipment as Commander’s Option Items (e.g. T-bombs, extra marines, etc.) up to 20% of its combat BPV if both players agree to allow them. See (S3.2) for details and exceptions.
(PXSG1.44) All refits are available subject to the players’ agreement on their use and the year selected for the scenario.
(PXSG1.45) The Republic ACA has been severely damaged. At the start of the scenario, mark the following boxes destroyed: Both boxes of the KHWZ, seven boxes of LWRP, five boxes of RWRP, three boxes of FHULL, two boxes of AHULL, one TRAC, one TRAN, all PH-5’s except the L PH-5, three boxes of IMP, two SHTL, one BRDG, two LAB, two BTTY, all SHIELDs except for two boxes of SHIELD #2 and one box of SHIELD #5.
(PXSG1.46) The Regime FZ4 has suffered minor shield damage. Using 1D6 for each point, randomly distribute three damage points among the six shields.
(PXSG1.47) Republic ships can only disengage on the left side of A and D on the map.
(PXSG1.48) Regime ships can only disengage on the right side of C and F on the map.
(PXSG1.5) VICTORY CONDITIONS:
Attacking Player:
Legendary Victory – both the Republic FFCA and the Republic ACA are destroyed. The Regime FZ4 was not destroyed.
Decisive Victory – the Republic ACA was destroyed. The Regime FZ4 was not destroyed.
Marginal Victory – The Republic FFCA was destroyed. The Republic ACA disengaged. The Regime FZ4 was not destroyed.
Defending Player:
Legendary Victory – The Regime FZ4 was destroyed. The Republic ACA and the Republic FFCA disengaged.
Decisive Victory – The Regime FZ4 was crippled or disengaged. The Republic ACA and the Repubic FFCA disengaged.
Marginal Victory – The Regime FZ4 was destroyed, crippled, or disengaged. The Republic FFCA was crippled or destroyed. The Repubic ACA disengaged.
(PXSG1.6) VARIATIONS: The scenario can be played with different ships of the Regime, Republic, or both. Multiple ships on either side or both can be used. Carriers and PF Tenders can be used. Other Project-X Empires can be substituted for the Regime, Republic, or both.
(PXSG1.7) BALANCE:
(PXSG1.71) To make the Attacking Force stronger, substitute a Regime starship with a higher BPV for the Regime FZ4.
(PXSG1.72) To make the Defending Force stronger, substitute a Republic starship with a higher BPV for the Republic FFCA.
(PXSG1.73) To make the Attacking Force weaker, substitute a Regime starship with a lower BPV for the Regime FZ4.
(PXSG1.74) To make the Defending Force weaker, substitute a Republic starship with a lower BPV for the Republic FFCA.
(PXSG1.75) To make the Defending Force stronger, reduce the amount of damage sustained by the Republic ACA.
(PXSG1.8) TACTICS
DEFENDING PLAYER: Due to its reduced number of PH-5’s, the FFCA is going to have a hard time dealing with the Regime’s Light Missiles. Plan accordingly, taking the damage on a specific shield if necessary. You have the advantage of speed which gives you the initiative during engagement and allows you to control the distance during the battle. Remember that your goal is to have the Republic ACA disengage. If you must sacrifice the Republic FFCA for this goal, so be it.
ATTACKING PLAYER: In order to win, you must destroy the Repubic ACA before it disengages off the map. Keep your target in mind and close in as fast as you can. Whenever you have a choice between firing at the Repubic ACA or the Republic FFCA, choose the Republic ACA. Destrooy the Republic ACA at all costs, even if you must suffer heavy damage to do so.
(PXSG1.9) DESIGNER NOTES
This scenario familiarizes players with the strengths and weakness of the Republic FFCA and the Regime FZ4, while throwing them into an exciting conflict and desperate race for survival. Experiment with the scenario, modifying it as necessary until both players find playing their side to be tactically challenging.